How to use Neutral Density Filters with your Drone

What are Neutral Density (ND) filters?
Essentially, ND filters are a piece of darkened glass that you place over your camera’s sensor. They’re used to assist in lowering the amount of light entering the sensor, enabling you to use the correct shutter speed to capture the perfect photo!
ND filters for the Phantom and Mavic series are generally rated in numbers so we are able to understand how much light they are stopping from entering our camera’s sensor.
For example, an ND2 filter gives us one stop of darkness, an ND4 filter gives us two stops of darkness and an ND8 filter will give us three stops of darkness and so on.
So, say our camera’s shutter speed is currently 1/200 and our goal is to get the shutter speed to 1/100, we would apply an ND2 filter as it is applying one stop of darkness, essentially doubling our shutter speed.
When should I use an ND filter?
ND filters are essential for bright and sunny days, as well as overcast days with a large amount of glare. When I’m capturing photo’s, I always apply an ND filter to my camera’s lens any time after 10am to approximately 3pm. These times are the brightest times of the day and I need the assisting of the filter to add the desired stops of darkness needed. They are essential in assisting you to acquiring the correct shutter speed and exposure settings for those bright and overcast situations.
For video, the golden rule is your shutter speed should always double your frame rate. By doing this, you’ll give your finished video’s a nice cinematic motion and feel. For example, if you’re planning on shooting at 4k @24fps, your shutter speed should be set on 1/48 however, the nearest shutter speed on the DJI Phantom and Mavic series are 1/50, so you would use that.
Sometimes the conditions are just too bright and overcast to obtain a 1/50 shutter speed with the stock filter without over exposing the shot. This is where an ND filter needs to be fitted to apply a certain stop of darkness to obtain a 1/50 shutter speed, as needed in the above scenario.
HINT: Remember to always be slow and smooth on the controls when panning with video. You want to avoid any erratic movements, something that does not look good to the eye!
What is your ‘go to’ filter?
Without a doubt, it would be the ND8 & ND16 filters.
The ND8 I generally use between 10am and 12pm and the ND16 filter I use between 12pm and 3pm.
Both these filters give three and four stops of darkness, perfect for getting my shutter speed to an ideal 1/120 -1/160 for those top down and landscape shots during really bright and sunny days.
HINT: If you want to create long exposure shots like the one above, try fitting an ND32 filter onto your camera and shooting just before sunrise (10 minutes before) or just after sunset (10 minutes after). This will give you five stops of extra darkness and enables you to open your shutter speed for 1 - 3 seconds of exposure, turning those waves into a magical whirlpool!
What brand do you recommend?
I’m a huge believer in the PolarPro filters for the the Phantom series.
Not only are they high quality, easy to install and affordable, they are designed to not overload your gimbal and cause damage to your very expensive toy.
I’ve tried and tested a large amount of different branded filters and nothing comes close to the PolarPro range.
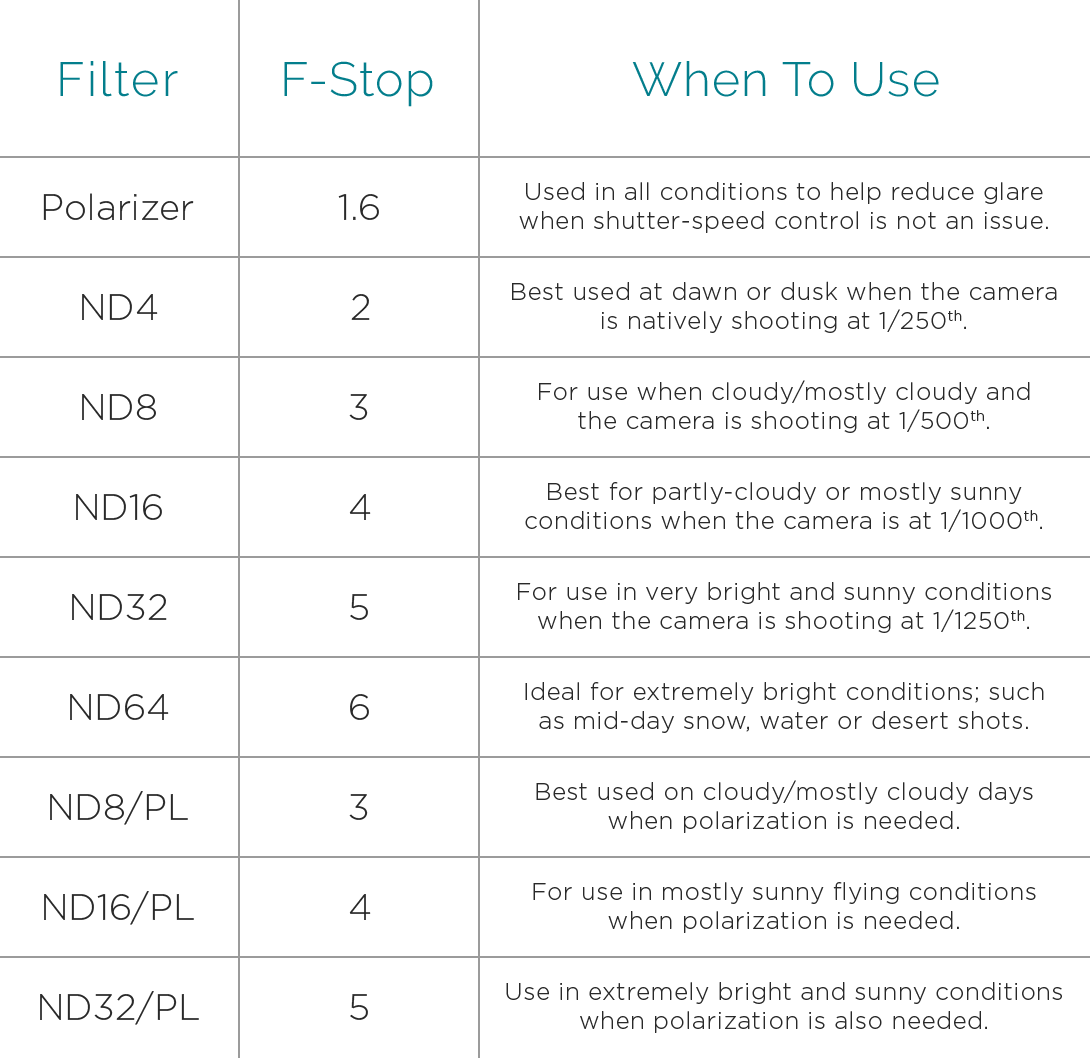
See chart below for a general guide on when ND filters should be applied.
____________________________________________
Our Guest Blogger
Out Droning is an award winner aerial photographer from Sydney, Australia, who has been mastering the art of drone photography with the Phantom Series drones for the past year.
His work has been featured on the official DJI Global facebook & instagram accounts (@djiglobal), Visual Ambassadors (@visualambassadors), Hype Beast (@hypebeast), Space Wheel (@spacewheel) and many more high profile accounts.
Out Droning work is quickly becoming internationally recognised. You can check out his stuff at www.instagram.com/out_droning
© Words and images are the intellectual property of Out Droning / Crazy Shot Drones

Leave a comment
Comments will be approved before showing up.
Also in Stories from the sky
Follow
✉ABN: 75 625 517 375
Call us: 1300 79 03 51
Email: info@crazyshotdrones.com.au
(Email response within 24 - 72hrs)
Chat/Call Support Hours: 9am – 5pm (AEST)
Sign up to get the latest on sales, new releases and more …
We are an Australian retailer and pride ourselves on providing the best customer service and advice. Alternatively please call our friendly team for support. (Support Hours: 9am – 5pm AEST)
![]()


© 2026 Crazy Shot Drones.
Out Droning
Author